Our buddy Justin Gale gives a great explanation on how to share your available times on google calendar. Make sure you go and check it out and if you have any questions ask us!
Share Your Google Calendar Free/Busy with Others via a Link in your Email Signature!
(Previous Title: Sharing Your Google Calendar with the World – Even as a link in your email signature)
REVISED 2013-11-11
Follow Justin Gale on Google + (https://plus.google.com/+JustinGale)
Background:
Many people know that you can embed a Google calendar into a website, or blog, but you can also simply post the calendar as its own standalone webpage. This can be very useful when trying to share your Google calendar free/busy status with those outside of your organization, who may not have a Google account.
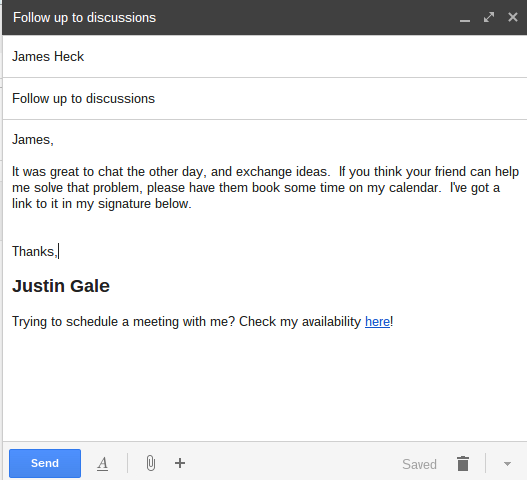
Imagine a vendor/partner receiving the following email, then clicking the calendar link in your email signature to see when you might be available!
The inspiration for this comes from +James Heck (a colleague) who put a clickable link to his Google calendar in his email signature. I thought it was interesting, but really did not understand it for awhile. Then I got involved in some projects where I was regularly being asked to meet with people outside our organization, and was constantly being asked about my calendar availability. As you can imagine, that quickly got very tiring, so I revisited his tip…and hopefully improved it a little, so here goes!
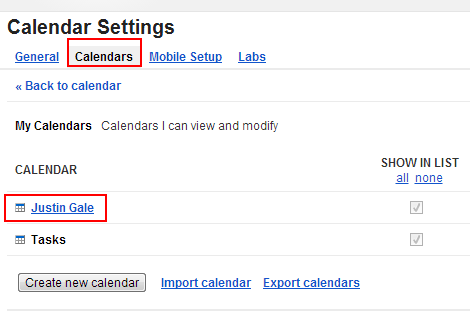
1) Go into your calendar settings for the calendar you want to share, then select the Share this Calendar tab.
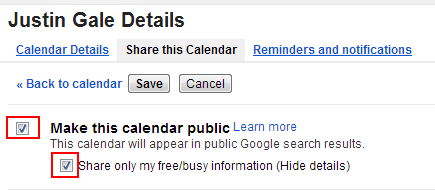
2) If you are using a Google Apps, you need to check Share this calendar, check Make this calendar public, and set the detail to See only free/busy…to allow anyone outside your organization to see your calendar.

Or, if you are using a personal GMail account, the calendar sharing settings are a bit simpler…check Make this calendar public, then check Share only my free/busy information. Note: if you do not check this setting, and have the calendar shared public, all details will be shared.
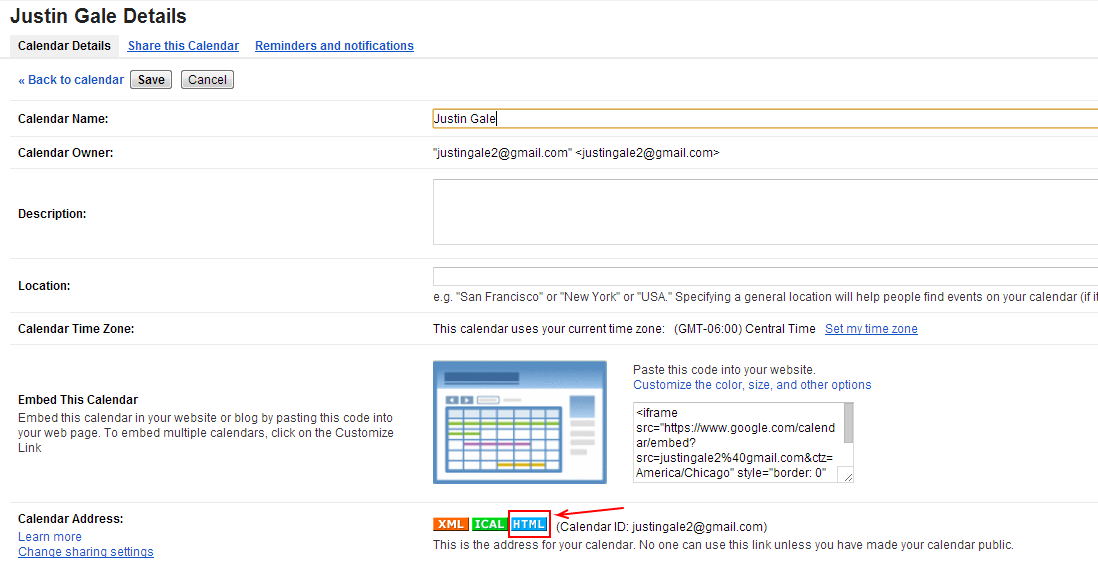
3) Now your calendar is ready to be shared, so lets get the link for your calendar (with your time zone) that we want to share. Go into your Calendar Details, and we will use the HTML option of your Calendar Address to help us get the URL/Link we need, so click HTML, then click on your calendar link in the pop-up box
4) You should now be looking at a month-view of your Google Calendar. The biggest problems with this as a default are:
1) The Month view does not quickly show your availability, only the hours that a meeting/event starts.
2) The Time Zone reference is actually pretty small and at the bottom, so sharing with people in other time-zones can be confusing to them
example: Top of Calendar (Default)

example: Bottom of Calendar (Default)

5) The good news is that we can easily tweak the URL link to help us show what we want.
First, add the following code to the URL link at the end: &mode=Week
This should change the URL from something like:
https://www.google.com/calendar/embed?src=justingale2%40gmail.com&ctz=America/Chicago
to:
https://www.google.com/calendar/embed?src=justingale2%40gmail.com&ctz=America/Chicago&mode=Week
revised top of calendar:

6) The final thing I suggest it to change the Calendar Title to emphasize what timezone you are in (especially if you deal with people in other timezones! Using Chrome, this is very easy, as it will generally translate most spaces and symbols into the appropriate HTML. We simply go to our Calendar URL address and add a final bit of code to the end – something like: &title=Justin Gale (Work Calendar – Central Time Zone)
revised top of calendar:

So we should now have a new link that looks like this (note that Spaces got translated into %20):
Highlight and copy (Ctrl-C) your version of this link that shows your special calendar view! We will use it to create a link to your calendar!
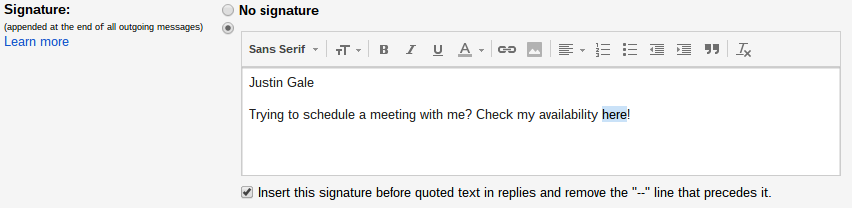
7) Now lets update your Google Mail Signature to include the final link for everyone. Update your signature to end with a line like “Trying to schedule a meeting with me? Check my availability here!”
Then highlight the word here and click the link symbol 
8) Next, we take the URL/Link from step 6 above, and past into the web address and click OK:

9) Finally, in your Google Mail settings, do not forget to scroll down click Save Changes.
10) Congratulations, you should now have a great new Google Mail signature that includes a link to your Google Calendar showing your free/busy availability. Hopefully, this will better allow others outside of your organization (and who may not have “Gone Google”) to more quickly and efficiently schedule meetings with you.
Here is just a quick example of using the new signature and how it might look:
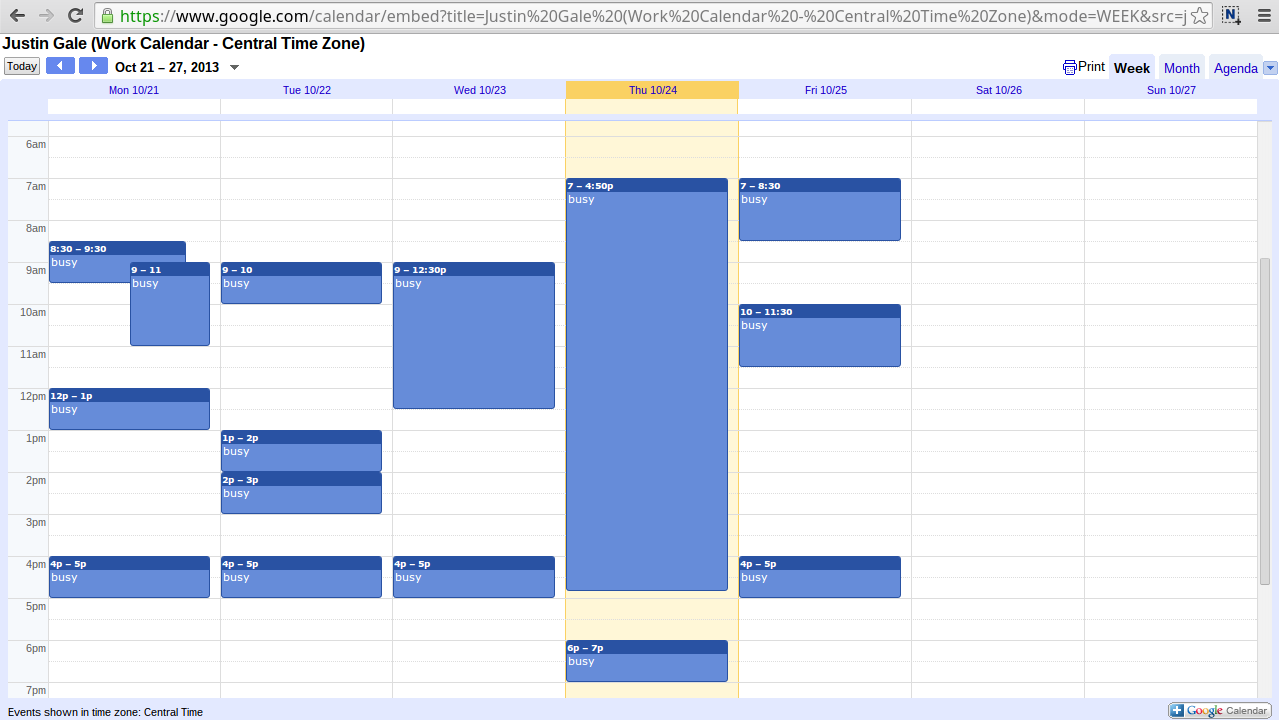
And what happens if you click the “here” link:
Enjoy!
Richard Otis